Fosshape Tutorial - Basics, Skullcap and Tophat

Basic Information
Fosshape is the unique non-woven, heat-activated fabric. This soft, pliable fabric can be formed and shaped into fantastic permanent objects when exposed to steam, heat or dry heat.
It remains full permeable and breathable following heat activation, making it a safe and easy-to-use ''Buckram'' replacement, without the mess.
Fosshape activates in the range of 212° - 265° F (100° - 130° C) with no long setting up time. Easily painted or decorated with a variety of artisan coatings and paints, Fosshape has superior strength and flexibility, yet is wonderfully lightweight and mildew resistant, You can produce headpieces, sub-structures, ornamental effects, masks, props and scenic materials.
Fosshape can be worked with a steam iron or costume steamer with or without molds. The level of stiffness is achieved by adjusting heat, time and pressure.
The material can be sewn and cuts with a knife or scissors. It bonds to itself and can be hot glued or stapled to paper, wood, cloth and Wonderflex.
Instructions for Use
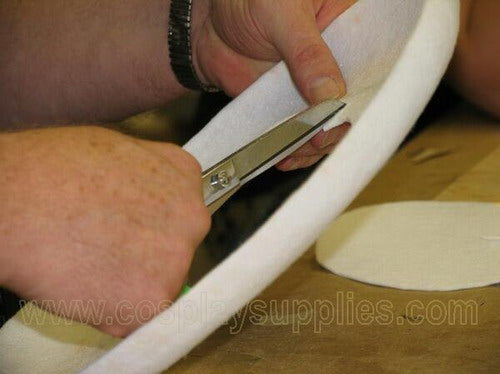
Cutting: Fosshape cuts easily with scissors and will not fray. Depending on the amount of heat and pressure applied, it can shrink over 30%, so you may wat to preshrink it before cutting.


Sewing: Fosshape can be sewn to itself or other fabrics. Great on its own as an outer shell surface for three-dimensional figures, it's also an ideal hidden stiffener or support for costuming.


Stuffing and forming: For lightweight props or character heads, drape and fasten Fosshape over a wire frame or armature, or stuff a pre-stitched form made of Fosshape with batting material.
Layering: Fosshape will stick to itself, but not to you and may be layered to achieve the required rigidity and density. A steam iron with hand pressure will create an adequate bond between layers and provides more surface smoothness.
Heating: With a gentle waving motion, apply heat with a steamer over the fabrics surface, allowing it to shrink around the form or stuffing. Keep your heat source 6-12 inches away from the Fosshape surface to start, then slowly bringing it closer maintaining the waving motion to better control the shrinkage factor. After steaming and shaping, remove the structural form or batting, depending on your requirements.

Decorating: Fosshape can be decorated with a wide variety of artisan paints and coatings - no primer needed- and can even be dyed. Decoration may be stitched or glued on. 100% synthetic, it will hold up well in humidity or rainy conditions.


Getting to know the product
- It is very important to understand what the product is capable of doing. And not to ask it to do things that it simply can't.
- You must experiment with the product in order to develop a relationship.
- It is not magic. However, if asked to perform within its capabilities it will do so beautifully.
- Because Fosshape looks like felt, we tend to think it functions like felt. It doesn't: Where felt will stretch, Fosshape will shrink.
- It will stretch, some, but with each stretch, you lessen the depth of the finished product and therefore weaken it.
- It can shrink substantially, depending upon temperature and application of the heat source.
- Fosshape will respond to dry or wet heat. I find the most successful way to control the product is using steam.
Creating a Fosshape skullcap or hat base/form
You can use any cap pattern you may already have, or simply create one. The pattern should be slightly larger than needed, as the Fosshape will shrink.
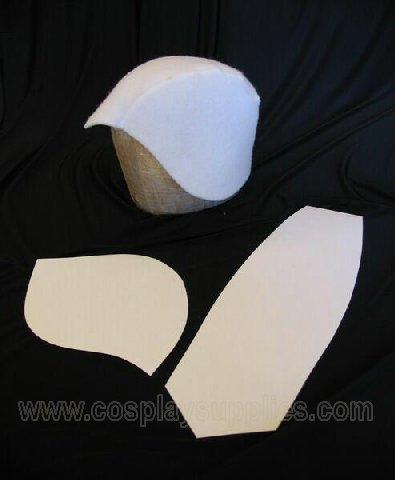
Below: Skullcap pattern cut from Fosshape and stitched together.

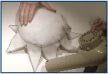
Skullcap fit over wooden head block and pinned in place for steaming. It is always best to cover the head block or form with plastic and tape

Apply steam directly to the surface of the cap, but keep the steamer moving so as to not leave marks. Hit the seams first and work your way down the skullcap.

Above: The Fosshape skullcap stiffened with steam.

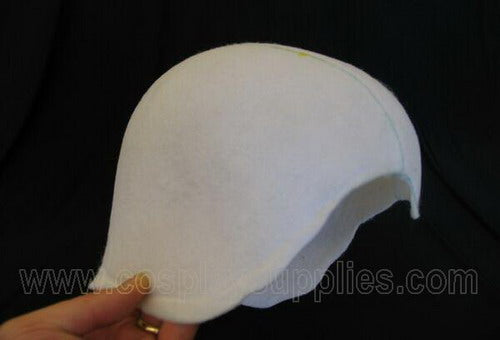
Above: the stiffened Fosshape wig base ready to be fit. You can fit the cap to your specified design requirements. Trim edges , establish hairline, apply wires if needed and finish.
Creating a Fosshape Top Hat

The form allows you to make hats in 6-9-12 inch height increments and circumference plates can be cut for any size head.

Create a simple pattern for the top and the side of the crown. Using a fairly tight stitch, machine the pieces together. The top is being reinforced with a circle of foam core cut to the desired finish and pinned in place.

Set this onto the form which can be as simple as a tin can atop a wooden head block that you have covered with plastic and taped in place. A piece of elastic is being secured around the bottom.


Begin the steaming process, starting with the vertical seam. The look will be most successful if the circular seam joining the top to the side of the crown is rolled slightly to the top of the hat as it is pinned in place.

Here you can see one side steamed and one side not. The purpose of this photograph is to illustrate what happens in the steaming process. I don't find it advisable to approach the process this way but rather to apply the steam evenly around the shape as you work, minimizing the distance of the steam source from the fosshape as you proceed.

The fully steamed, fosshape top hat crown.

I use brim forms sometimes called ''flanges'' that can be found at flea markets, antique shops and on e-bay.

It is great to have a large variety of these forms to pick from, however one form can be used for a multitude or purposes.
A lack of equipment should not inhibit your enthusiasm. A large salad bowl is often acceptable or it is easy enough to carve a form from styrofoam.

Fosshape being stretched over a brim block:

To create the lip that will attach the brim to the crown, a hat block or wooden disc the size of the desired circumference plus, is pushed into the fosshape as you steam.

Further stiffening from the under side will guarantee the brim a stiff lip to be sewn to the crown.

Trim the outside of the brim first.

Mark the height of the crown carefully, double checking to make sure you maintain the desired circumference as well.

Fit and mark the placement of the brim.

Finish trimming the brim. Cut an oval from the inside of the brim leaving a 3/4'' inch lip to be clipped and sewn to the crown.
If the hat is to be wired, and I suggest that you do as the fosshape will stretch and soften slightly over time, It should be done prior to joining the crown to the brim. Here the brim is positioned and pinned to the crown before sewing by hand. In theory the product will adhere to itself when this join is re-steamed, however stitching adds security.

Here we have a top hat ready to be dyed, covered or painted.
Fosshape dyes beautifully however the saturation level and intensity of the desired color will effect the method and timing of the dyeing. If you seek a dark or intense hue, it is best to use a hot dye bath.
If you use hot dye you should dye the pieces while they are still attached to their forms as the heat of the water can cause the fosshape to become warped. Light and pastel colors are easily achievable in a cool dye bath.

Fosshape responds beautifully to paint. Here we have used a combination of Design Master sprays to color the fosshape,and tube acrylic to highlight specific areas.

In this example the fosshape form has been covered with fabric. This process is the same as you would use to cover a buckram frame except, because of the thickness and finish of the fosshape, there is no need to cover the form with a layer of batting or ice cloth.Depending on the shape of the form, stretch fabrics can be very advantageous.

Look for hat shapes in unusual objects. Creating custom forms can be very rewarding. Be creative and resourceful, just remember that the objects must be able to be removed once the fosshape has been steamed.
