Wonderflex Introduction
Originally published Sept 2005
What Is Wonderflex?
Wonderflex is a type of thermoplastic that is shaped with heat. Thermoplastic has been around for a long time, but unlike other forms of thermoplastic you don't need to put this in your oven, and it doesn't smell like burning DEATH when you work with it. (It's non-toxic too, which cosplayers tend to ignore for their hobby, but is a nice side bonus anyway). It is also unique because, on the bias (diagonal line) it will stretch when heated, allowing full, round shapes and bell curves.
What do I need to use Wonderflex?
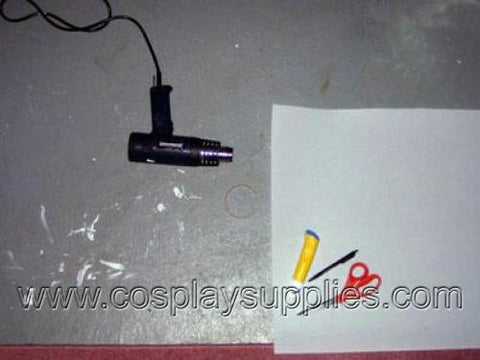
The basics of Wonderflex working is a hard surface (I'm fond of cement floors, and you don't want to work on carpet), Wonderflex, a pencil, some craft scissors, a heat gun (also known as a paint stripper and available at almost any Walmart/Home Depot/hardware store you visit, usually under $30), some paper and/or fun foam for patterning, and tape to help you hold pieces together for mockups and testing. Also, any reference image you can get your grubby hands on.
What can I make with Wonderflex?
If you can think of it, you can probably make it. I have successfully made armor, chest plates, kneepads, staff tops, swords, and automail. My next projects include a shield, more automail, persocom ears, a Boogiepop Phantom hat and floaty-ribbon-o-death, and a bunch of small daggers and knives. With practice and work you can make it take just about any form.
Wonderflex and insulation foam staffs by Lauren and Hannah of Idjit:

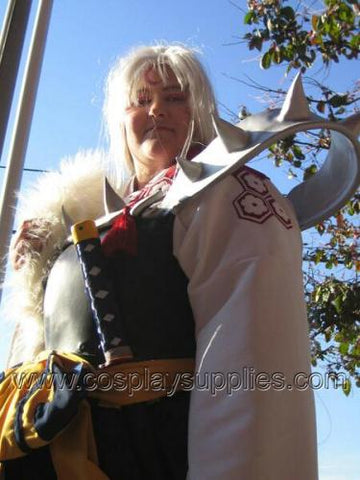
Lord Seshoumaru of Inuyasha
Edward Elric of Full Metal Alchemist
Wonderflex does things craft foam can't -- like complex bell curves. This means you can make a close fitting chest plate, or do exaggerated shoulder armor (from Clamp's Rayearth, or Yu-Gi-Oh!'s Dark Magician, for example). Unlike other kinds of thermoplastic, Wonderflex does not develop stress marks or wrinkles, and does not weaken along curves.
Automail fingers that circle the finger and are rounded, not square, at the tip.
And because there's no drying time for Wonderflex itself, unlike paper mache, you can work on a project until it's done.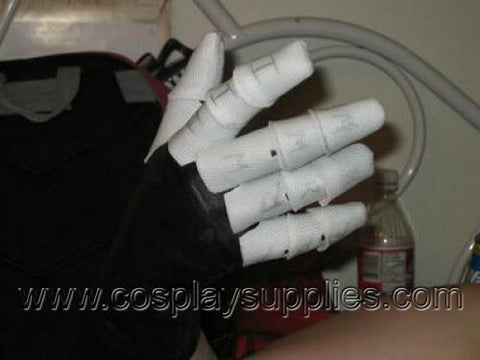
Wonderflex is not fragile like Sculpty or Paper Clay. A staff top made of Wonderflex can be dropped, banged, or used to discourage an over-enthusiastic fanboy/girls and not react in the slightest. Stepping on it will probably crack your paint job, and may pop a joint, but the plastic itself is near-indestructible. It can, under areas of EXTREME stress, over a period of time and with two loose areas rubbing against each other, develop a rip at the bottom, exposed edge. However this is easy to repair, and has only occurred once of everything we've completed so far, on the bottom edge of Seshoumaru's chest armor where the sword had been rubbing for two days. (The tear was a centimeter deep and didn't spread at all, even though it was under constant pressure.)
What can't I make with Wonderflex?
Wonderflex needs to be coated in some form of base in order to smooth it out, as in its raw, shaped form, it has a texture similar to duct tape. Those ridges will show up when painted, especially if the surface is to be silver or gold and shiny. Therefore Wonderflex is not very suitable for very fine detailing like filigree work. Very thin pieces less than half a centimeter wide can snap under pressure, and will not support themselves upright unless given a double thickness.
Pieces such as Queen Beryl's headdress shown below, or Zoicite's shoulder detailing, would not be advisable.


Is it easy to use?
Yes! Wonderflex is really quite user friendly. I had never worked with any form of plastic before using Wonderflex, and it took very little time to grow accustomed to. Because it is activated by heat, you can play with it at different temperatures to achieve different results. If you make a mistake, you can reheat it to reform it. Joints are made by heating two pieces and pressing them FIRMLY together. If you make a mistake heating the joints again allows you to separate them, but once cooled fully bonded joints will not separate.
Remember, I am not an expert! One of the reasons I'm creating this FAQ is because I'm one of the most experienced people in the cosplay community using Wonderflex right now, but that in no means makes me the resident-know-it-all. If you find another way of doing something, please let us know so this FAQ can stay updated with the latest techniques.
How do I shape it? Can I use my bare hands?
Wonderflex is suggested to be shaped while wearing gloves, but I find as long as you allow it to cool slightly I can shape with my fingers without problem. There IS some discomfort, and it does require a high heat tolerance -- if you are very sensitive, or worried, a pair of tight fitting leather gloves may be advisable.
Wonderflex can be shaped in three ways.
The first method is free form. Take your Wonderflex, heat it, shape it, let it cool. If it needs further shaping, heat it again. Easy!
The second method is a positive mold or form. This is what I use to make chest plates and automail. Making a duct tape form I shape the Wonderflex over the form. This is also the method I suggest for staff tops with dimensions and things like Ed's spear. Create a shape out of foam (upholstery foam, or pink insulation foam) and cover it in a layer or two of electrical tape. Then simply shape the Wonderflex over it. This allows for large shapes that look hollow and are lightweight, and is especially useful if you cannot do the third method. The Luna and Solaris staffs shown below are made of this method.
Insulation foam covered in duct tape, Wonderflex formed overtop. Unpainted:

The third method is a negative mould. This is a hollow shape you push the Wonderflex into to take a form, similar to vacuforming. I have yet to try making negative moulds, so I can't comment on the process. I do know this is how Disney makes their Wonderflex items, and this allows for hollow shapes in any size.
As for cutting? I use plain old scissors, and a utility knife for shaving down tricky, tight curves.
How do I pattern it?
create my pattern first by experimenting with shapes drawn onto newspaper, then cut out of fun foam when I think I have the right size/shape. When everything is cut out of fun foam and pieced together properly, I then transfer the fun foam pattern onto Wonderflex. See examples below.
If I am making something with curves, like a chest plate or bell-curved shoulders, I make fabric patterns out of broadcloth to give me a better idea of how the Wonderflex will actually sit, as paper and fun foam only curve one way.
Automail pattern and spear base:


How much will I need?
It's very difficult to guestimate the amount you'll need. Finish your pattern first. Then, on concrete or a rug you won't mind putting tape down on, Measure out a rectangle 39'' by 57''. Start laying out your pieces on it like a puzzle, trying to keep them as close together as possible without touching. When that square is full start another one, and another, until you are out of pieces. The amount of squares you have is how much Wonderflex you'll need. I'd then add half a sheet more to that for mistakes and second guessing.
Also, ALWAYS keep your scraps of Wonderflex- I never throw it out, as even small scraps can be used later for reinforcing joints or raised details.
How do I smooth it out?
As previously mentioned, Wonderflex has a raised texture, similar to duct tape. To smooth it out I use layers of gesso, sanded between applications, to fill in the bumps. If you are sanding something curved, do yourself a favor and invest in a handful of sanding sponges. They are easier to use, come in many degrees of roughness (I use a fairly coarse sponge for the most part), sand faster than paper, and are much, much easier to use on curves and corners.
I purchase gesso from Wallmart's art department and Michael's art stores, and it's available at most online art retailers.
For areas that will bend (Areas that are without support, such as the wings on the Ed Spear) you may stress the gesso and cause it to crack and flake. The easiest way to prevent this is to ensure anything that is not held ion your body is supported- use doweling in swords, and foam bases for staff tops.
I am experimenting with Bondo at the moment, and will add my results to this when I have them.
How do I join pieces together?
Joints are made by heating two pieces and pressing them FIRMLY together. If you make a mistake heating the joints again allows you to separate them, but once cooled fully bonded joints will not separate.
How do I join Wonderflex to other materials?
I use snaps, hot glue, epoxy, 'Goop' glue, and double sided foam tape (the GOOD stuff) to join Wonderflex to foam, fabric, and anything else needed. I've also used nails and screws for the spear, but I would suggest utilizing screws for the most part, or nails with a large head.
Note: hot glue and spray paint do not mix well. I.e., the hot glue will peel off and you loose the join.
How do I paint it?
Any paint that's made for plastic works. I use Tremclad Hammertone Rust paint for my Automail, for the 'hammered metal' look, and for a highly silver/gold look I use Krylon Short Cuts Craft Enamel. If the Wonderflex has been gessoed acrylic paint will apply with no issues, and I've used fabric paint for raised detailing. Be aware that with paint, especially spray paint, you will get what you pay for, and cheap paint likes to flake.
From Amethyst Angel's Website:
One caveat about using Testor's paint. It will react negatively to vinyl. (Specifically, it will rub off onto anything vinyl that comes into contact with it.) This is important to remember if any part of the costume you're wearing is made of vinyl fabric or if you're thinking of securing the armor to your body with vinyl straps. (You could try using acrylic paint to paint your armor instead of Testor's--acrylic paint will NOT react negatively to vinyl-- but be warned, it will not stick to the surface of the plastic sheeting as well. You should sand the plastic first and then coat the painted acrylic surface with an acrylic varnish.) If Testor's paint should come into contact with vinyl and stain it, it can be easily removed with paint thinner or brush cleaner, so don't worry if that happens. (For the record, leather and suede will NOT react negatively to testor's paint, so it should be safe to use for your costumes.)
Will it break under stress?
No. Don't make a ladder of the stuff, but Wonderflex is a very resilient plastic- it will bend under pressure, but not break. I have yet to manage to tear or break anything I've made and I've tried to tear/snap raw pieces with no luck.
Will it loose its shape during a hot day of wear?
Yes. Wonderflex WILL soften if left in a car on a hot day (not a good idea) and if you have painted your prop black (like Seshoumaru's armor) and leave it out under direct summer sunlight, again it may soften, but simply moving it back inside the house, or even under shade, will set it again.
If you are traveling long distances in a car that is not air conditioned, it is a good idea to ensure your prop is well supported and does not have any pressure on top of it. If it is small, pack it in the cooler with your food.
Is it flexible when it's cool?
As standard plastic, yes, it bends, but it will not bend out of shape. In other words, a sheet can be rolled for transport, but will unroll flat if untied.
Can I make it stronger?
Yes. Two layers of Wonderflex will bend much less, three layers won't want to bend at ALL. To create the immobile floating silver arch of Seshoumaru's armor, we used a piece of aquarium tubing for support. For swords I use wooden doweling to base the handle on and line the middle of the blade, to ensure it won't bend while being used. It also insures I won't have any weakness between the hilt and sword, as they're essentially one piece.
Seshoumaru's Spikes do not move in this costume at ALL, and are never lying against Jen's arm.
Can I use it to make full body armor?
Yes. Be aware that pieces that are not being supported by you but are being built out, you will either need to make a negative mould, or build over foam to ensure support. Wonderflex is around 4lbs per jumbo sheet, so keep in mind weight will be an issue as well.
Tips and Tricks
- For flat seams, heat the Wonderflex to the barely-tolerable range your fingers have, and then mash the join together, if possible on a flat surface. Using something to help you press without your fingers directly on the Wonderflex is good too.
- Don't use the heat gun too close to the Wonderflex, it will melt and be too hot to work with for longer periods of time.
- Pay attention to he Wonderflex as you heat it: it will begin to show when it is softening, the texture changing slightly under the light and if it is flat on the ground, the sides will attempt to warp for a moment or two.
- For raised detailing, fabric paint can be drawn on and then painted over.
- Try to keep brush strokes to a minimum when applying Gesso, and sand them down between layers.
- Split pins, snaps, and nuts and bolts all help make joints.
- If you haven't made the item before, try making it out of fun foam to pattern it out first.
- Save every scrap you have left over, as they can be small details and help support seams.
- Practice. Experiment. If it goes wrong, heat it and tear it apart and try again.