Tila 2-hole Beads Flower Bracelet
Here's a tutorial showing the process of making a bead flower bracelet, provided by Miyuki Co. Ltd.
Finished size: About 18cm


Materials: Tila 2-hole beads, Delica beads, 6mm fire-polished beads, nylon beading thread
Tools: Scissors, ruler, tape, awl, beading needles
1. Use two 90cm lengths of nylon thread to make two flower motifs [A] as shown. Don't cut the thread ends of motifs. (Thread tails are shown in different colours for easier view.)


2. Use three 75cm lengths of nylon thread to make three flower motifs [B] as shown. First, make the central motif [b] and the continue weaving around [b]. Don't cut the thread ends of motifs.


3. Use two 50cm lengths of nylon thread to make two flower motifs [C] as in the picture. First make the central motif [b] and then continue weaving around [b]. Don't cut the thread ends of motifs.

4. Use a 45cm length of nylon thread to make one piece of the flower motif [D]. First make the central motif [b] and then continue weaving around [b]. Don't cut the thread ends of motifs.

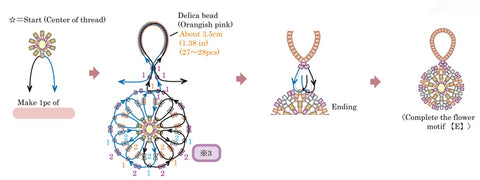
5. Use a 75cm length of nylon thread to make one piece of flower motif [E] as shown. First make the central motif [b] and then continue weaving around [b].
After making [b], make the loop. Pull the thread tight and knot twice. Pass the excess thread through 2 or 3 beads, then cut off.

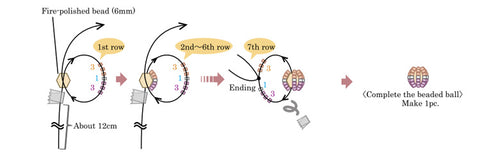
6. Use a 40cm length of nylon thread to make the beaded ball. Tape the thread to about 12cm from end, then pass the longer thread tail through the plastic bead to make the first row and repeat the process six more times. Remove the tape from thread before making 7th row. Pass the starting thread and thread end through the beads as shown. Then pull thread tight and knot twice. Pass the excess thread through 2 or 3 beads, then cut off.

7. Assemble all motifs and the beaded ball. Use thread ends (star mark in the picture) of flower motifs [A] to [D] to assemble all motifs together.

Cut a new 30cm piece of nylon thread to connect the beaded ball to flower motif.
